Showing posts with label 2012. Show all posts

Saturday, February 18, 2012

First Finish in Ages!!


A lady in my online group, Sue, was in a car accident in December and broke one of her legs BAD - as in "broken in 3 places" bad! So, the group quickly decided we needed to do a "comfort quilt" for her, because that's just how we roll. I truly love this lady, and quickly offered to do the block collecting and design/piece the quilt. I didn't really realize what I was getting myself into - we all piece differently, measure differently, etc.. But the scrappy blocks I received were gorgeous & I LOVE the way it turned out! It's way larger than I expected it to be at just under 80"x80". I guess this is more than a "lap" quilt, huh?

I think this one took the life out of me a few times. I have been so tired that I mis-cut every piece of fabric I took the rotary cutter to before today (I'm writing this on Sunday, January 29th, 2012). I had to go back to the quilt shop, FiddleSticks, TWICE to replace improperly cut fabric. Of course, I could never cut the fabric too BIG - it was always (really - ALWAYS) 1/4" too small! Talk about disheartening...

Speaking of Fiddlesticks - I truly appreciate all of their help & encouragement regarding my design and choosing the fabrics for the background and "frames!"

Since the quilt is a surprise and Sue can't know about the quilt until the annual luncheon in mid-February, I'm going to make it so that this doesn't actually post until that date.

I hope Sue loves the quilt, and that the rest of our group members like it, too! I don't want to be the only one that loves it! LOL

:)

Tuesday, February 14, 2012

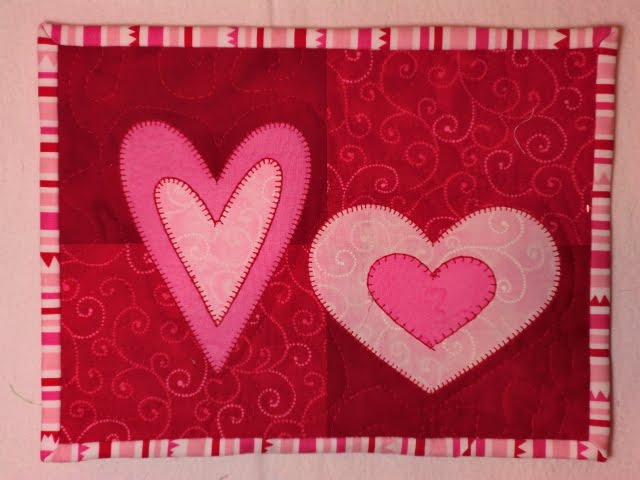
Valentine's Showcase Featured Blogger - Mug Rug Tutorial

I'm SEW excited to have earned my first "Featured Blogger" title!!! I've been wanting to make a "mug rug" ever since I first saw one a few months ago. My friend, Melissa, has offered the perfect opportunity by inviting me to take part in her Valentine's Day Showcase. It is a 2-week show of fabulous tutorials on her blog, Sew Bitter Sweet Designs. Thank you, Melissa!!!


For this project, I will tell you what I purchased, which is actually much more than I actually used. From the directions, you can tell that you need MUCH LESS fabric than what the supply list calls for. If you have smaller scraps, that would work perfectly!


Supplies:

~ 2 fat quarters, or large scraps, in coordinating reds
~ 2 fat quarters, or large scraps, in coordinating pinks
~ Backing fabric - 9x11 piece (half of a fq works perfectly)
~ Binding fabric - width of fabric (WOF) x 2" (mine equaled 44"x2")
~ Batting of your choice - size to match backing
~ Red thread - I used Guterman 100% polyester as it is the perfect color for both matching the reds and contrasting on the pinks
~ GO! Cutter - (not a necessity)
~ King of Hearts Go! cutter die (not a necessity)
~ Scraps of Pellon 805 Wonder-Under transfer web - or your fusible of choice
~ Scraps of tear-away stabilizer for appliquéing the hearts onto the background fabric (I believe the type I used is Sulky "Tear Easy," but I buy it by the yard and there is no label)


Instructions:

~ Back pink fabrics with fusible so that the fusible is cut with your fabric when run through the Go! cutter.

~ Run those 2 layers through your cutter.
OR, cut out 2 larger hearts and 2 smaller hearts from backed fabric if you do not have a die cutter.


~ Cut a 8.75" x 8" strip from your 2 red fabrics, then cut the 8" side in half to make 2 rectangles that are 8.75" x 4".


~ Sew the rectangles together, pressing seams open in the back, to look like the following:
NOTE: seams look gorgeous on the back when pressed open (!!), but you can press to your liking.


~ Peel off paper backing from your 2 smaller heart pieces (You will need a total of 2 large and 2 small hearts in one of each pink fabric). Test out how you'd like the inside hearts to look - do you want them straight on like the top 2 hearts, or do you want them "wonky" like the bottom two?


~ Iron the smaller hearts on top of the larger hearts with the opposite fabrics.

~ After the smaller hearts are in place, remove the paper backing from the larger hearts and lay them down on your background in a way that is pleasing to your eyes. I try a few looks and photograph them so I can see a different perspective. When it is to your liking, iron the large hearts down.


~ Back your mug rug top with the Tear Easy stabilizer making sure to cover the area where the hearts are located.


~ Test your appliqué stitch to make sure it is to your liking (I like to use a small/narrow button hole stitch for smaller appliqué pieces - on my Janome, it is a 3.0 length) and appliqué all 4 hearts using your preferred appliqué method. When I start each new heart, I like to start with both threads coming to the top. Then when the appliqué is complete, I take all 4 threads with a hand sewing needle and bring them to the back. This just prevents a mini bird's nest of thread on the back, which is just my preference.
NOTE: make sure NOT to iron the Tear Easy - it will melt on your project!!


~ Now that you've finished the appliqué, your "top" is done! (This is the point where I have to put myself on restriction to my sewing room so that I don't set the top aside for the next 6 years...)

~ Sandwich the top, backing and batting and free-motion quilt (fmq) the the mug rug. I'm working on getting more fmq practice! Otherwise, you really do not need a lot of "quilting" to stabilize your layers in this small of a project. You could simply outline your hearts 1/4" away and then stitch in the ditch of your background rectangles, and that would probably suffice.


~ After quilting, I trim the batting and background to the edges of the mug-rug, then check to make sure the dimensions look nice.


On this project, I felt there was too much "empty space" above and below my hearts, so I trimmed 3/8" off both the top and bottom edges. The mug rug top is now 9" x 6.75". When bound, I think this will look perfect!


~ Bind quilt using your favorite/preferred method.


~ Wa-LA! You're done! Congratulations and Happy Valentine's Day!

~~~~~~~~~~~~~~~~~~~~~~~~~~~~~~~~~~~~~~~~~~~~~~~~~~~~~~~~~~~~~~~~~~~~~~~~~~~~~~~~~~~

Melissa asked her bloggers to answer a few questions for her post. I liked the questions, so I'm going to include them here:

1. What got you hooked on your craft of choice?

I was originally "introduced" to quilting by my Aunt Jean. I never realized that "people" make quilts, that it isn't just some big manufacturing thing to make "blankets" that are sold in stores. I was in love with the idea and made a super-hilarious first quilt that we still use today. In 2000, I was introduced to Carol (who would later introduce me to her brother and would become my sister-in-law - fairly quickly!), and took some classes from her. At that point, I was truly hooked!! And in love...

2. What lights your crafting fire (i.e.: what keeps you crafting, why do you do it?)?

I love love LOVE bright colors. They keep me happy and keep my mood fairly upbeat. I also love to create something that I will use in daily life. I love it when someone says "oh, that's really nice," and I can say "Thanks so much - I made that!" It makes me feel really good.

3. What is your favorite Valentine’s themed junk food?

Oh my! I've never really thought about this holiday for junk food. I'd have to say that I LOVE See's Candy "creams," and milk chocolate.

Monday, February 6, 2012

Design Wall Monday ~ February 6, 2012

So, with as many blocks as I have to make, I've come to realize that my "Design Wall Monday" posts may come to be a little boring after a couple weeks...

I decided to make this quilt to fit our king bed. Each block is 14" x 14" (unfinished, which means 13.5" finished) and the quilt with be 8 blocks x 8 blocks. The dimensions will 108" x 108". I was going to pay to have it quilted, since it won't fit on my longarm, but my friend said I could quilt it on her longarm. That'll be nice - we can spend some time together while the LA is running. Can't argue with that!

So, back to the design wall. First of all, it's only as wide as the photo you see here - about 56" wide, so I'm going to be laying this quilt out and putting it together in sections. The colors aren't great in this photo - they're vibrant green, orange, and pink. They're all from the same fabric line as the inside square, so they look really nice together. I don't think I've ever made a quilt using mainly 1 fabric line, so this is a new fabric experience for me. I like it so far.

I asked my DH (Dear Husband) today "do you care if we have a totally girly quilt on the bed?" I loved his response: "no. When I'm in bed, I'm sleeping. But I like quilts. They're comfy." He said a few other things I don't remember, but this was the best and most memorable part. I love the way DH responds to my quilts. I think he'd love it if I made more - if I was more productive than I have been in the past. He just genuinely loves being wrapped in a quilt! I LOVE THAT!

I tried using EQ6 to design this quilt and got nowhere. I need an EQ6 book or cheat sheet! It's not that the design was difficult - at all. But I would have liked to make it so that a similar block never touched. In this layout, there will be some same blocks kitty-corner from each other. I may try to figure that out before I go much further so that it looks more random.

That's it for now. I hope to add more blocks later today!

(Update: 1:27pm - it helps when you add the photo... LOL)

Sunday, February 5, 2012

Stash Report ~ Week 6 ~ February 5, 2012

Oh DANG! I had to buy fabric yesterday for the bed quilt I'm working on right now. I had finally done the measurements and figured out I wouldn't have even close to what I needed! So, off to Fabric Depot & Fiddlesticks I went!
I bought 1 yard each of the red, orange, and green dots to equal 3 yards, and I bought more of the black floral.
The good news is that I won't have to buy fabric for awhile! Oh dang - did I say that last week? But seriously - I have
NO need for added fabric. I have several projects going and have supplies (aka: fabric) for all of them. I'm putting
myself on restriction!! NO MORE FABRIC! Ok, at least for this week...

I also bought a few small bits for a mug rug tutorial I'll be working on for Valentine's Day. I will be done with that before the 12th, as I'm doing it for a friend's blog and she'll be posting it on 2/13/12. :)

Used this Week: 1 yards
Used year to Date: 5.25 yards
Added this Week: 7.5 yards
Added Year to Date: 59.139 yards
Net Used for 2012: -53.889 yards

Monday, January 30, 2012

Design Wall Monday - January 30, 2012


I woke up before 4am today & was unable to sleep (the story of the past 5 days...), so I finally got up and got to work on my new quilt top! I found the fabrics at Fabric Depot last week, with exception of the black that I found at Fiddlesticks. The center's are 6.5" finished and will all be the same fabric. Then, each block will be framed in either pink, orange, or green "dots," and they'll all have a black frame, too. The blocks will alternate whether the black frame is next to the white square, or on the outside edge. So, with the 3 colors and the alternating black, there will be 6 different blocks total. Was that clear as mud? :)

I went to work today and was asked if I can put in "a lot" of hours this week (up to 40). So, that's definitely going to crunch into my sewing time. But I feel needed, so I'm going to help out. This quilt isn't going anywhere & I should be able to spend short bits of time in the sewing room - enough to keep my heart happy! :)

I hope next weeks design wall photo is FULL of blocks!

Wednesday, December 28, 2011

2012 UFO List Comes to Fruition

It was really hard to come up with this list because I have quite a few things that just need the binding sewn down on the back, and tons of things I want to "start." However, many of the binding projects were on my 2011 list and are still not complete, so.... I'm going to refresh with new items. Hope it works!

It will be interesting to see how this goes, because I'm using the list for two groups. One way or another, I hope these things are crossed off by 12-31-2012!


2012 UFO Quilting/Sewing List


1. Christmas Wreath (Bittersweet book)
- not yet started

2. Autumn Wreath (Bittersweet book)
- started December 2011

3, Quilt & bind “Alaska” table topper
- top complete in June 2011

4. Fuse & applique the 2011 “Lollypop Trees” 18” blocks
- August/September blocks are fused. Oct/Nov/Dec not started

5. HOB quilt binding and label
- and deliver to recipient (mail?)

6. Finish “A Secret Garden” quilt top (Pat Sloan pattern)
- top was started in early 2010

7. Finish quilting "his" quilt and bind
- on quilting machine now (surprise quilt - can't name recipient)

8. Finish quilty-batik sweatshirt
- started in ’05 or ’06

9. Cut down border & add new binding on David’s blue/white quilt
- SIL made it for him many years ago and it’s falling apart from so much use!

10. Finish “Luminous Diamonds” quilt top
- started in Spring 2010

11. Finish turquoise/purple “birds” messenger bag
- started summer 2011

12. Quilt & bind "her" quilt
- quilt top is finished (surprise quilt - can't name recipient - this is connected with #7)


I'll try to come back and post photos of the UFO items at some point soon...